|
The procedure described in the following applies to a system that uses only the CD-writing feature that comes with Windows versions XP and later. If you use a different program for burning CDs, please refer to the manual supplied with that program for details.
|
In this example, we will burn a data CD and an audio CD to show how it can be done in just a few easy steps using only Windows software. These two examples show that there is basically no difference between a virtual and a physical burner—except that, if anything goes wrong or the CD doesn't come out the way you want it, no blank CD is wasted when you use a virtual burner.
|
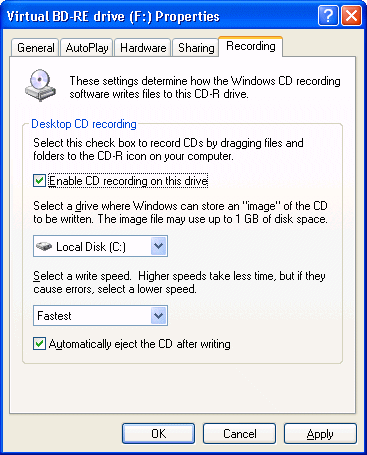
When using Windows XP, the operating system's own CD recording function must be activated for the virtual drive for the following procedures. This feature may have been deactivated for any of a number of reasons; for example, if another CD burning program is installed on the computer. To check whether this function is active, right-click on the virtual burner in the Windows Explorer and select Properties. Open the Recording page for the virtual burner and make sure the Enable CD recording on this drive option is active. This step is unnecessary if you use Windows Vista or later, since the operating system's CD-recording function is active by default. |
|
Support for CD-recording functions has been significantly expanded in Windows Vista and later, and differs from Windows XP in the following aspects:
|
|
For general information on Windows CD recording functions and related issues, please refer to the documentation on your operating system.
|
|
Because the procedures for burning virtual data CDs in Windows XP and in later Windows versions are not identical, the next section provides examples for Windows XP and Windows 7. The procedure for burning an audio CD is the same in both of these systems; thus only one example is provided.
|