The Blank Media Wizard creates new virtual media that can be used with the virtual burner. In addition to creating various types of virtual blanks, it can also create a data safe or activate the sound file mode. Unlike the function for direct creation of blank media, the Blank Media Wizard lets you define specific parameters for the virtual blank.
You can open the Blank Media Wizard by selecting Virtual blank on the Tasks and Tools tab in the CD Control Center. The Virtual blank button is divided into two sections. When you click on the upper portion, it opens an action prompt in which you can choose the operation you wish to carry out: open the Blank Media Wizard, create a data safe, or activate the sound file mode. The lower portion opens the dialog for direct creation of a virtual blank. You can also use the Starter to open this program, or select it under Virtual CD Programs in the Quick Start utility.
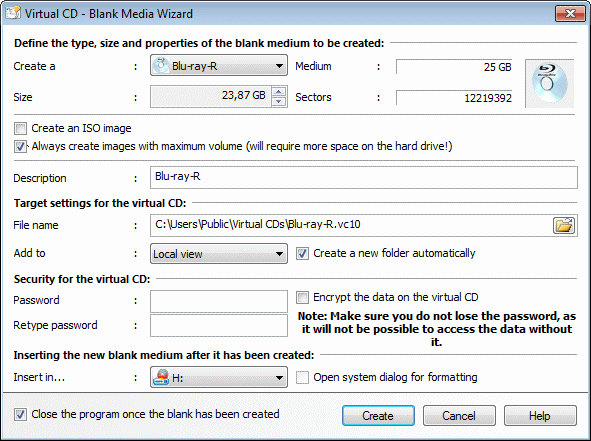
Specify the type of blank and other settings under Define the type, size and properties of the blank medium to be created. The type of blank is specified under Create a. Size defines the data capacity of the blank. You can select a size between 64 MB and 256 GB. When you select a blank type, its default capacity is automatically set. Medium and Sectors define the corresponding specifications of the new virtual blank, based on the type of blank and its size.
|
You can specify a non-standard size if desired, but keep in mind that you will not be able to use the resulting virtual CD to write a 1:1 copy on a physical medium.
|
|
For some virtual blank types, the size cannot be user-defined. CD-R blanks have to be between 64 and 799 MB. |
In addition to type and size, there are two settings that have a significant effect on a virtual CD blank:
| • | Always create images with maximum volume: In very rare cases, CD-burning software may attempt to write from the end to the beginning even on write-once media. This can take an extremely long time. This could create the impression that the computer is not responding, when in fact it is writing a data track—up to 50 GB, on a Blu-ray Disc—and the computer cannot respond normally until this process has been completed. The Always create images with maximum volume setting prevents this problem. Keep in mind, however, that the resulting virtual medium will always take up the amount of space defined here, no matter what volume of data it contains. |
|
To date, this phenomenon has been observed only when burning Blu-ray media using WinOnCD 10 and the Windows Live file system. In all other burning processes, with other media or other programs, it was not necessary to create a virtual blank with the maximum volume. |
|
Virtual blanks for ISO images can also be created with full data capacity. The process may fail, however, if you attempt to create an ISO image with greater capacity than that permitted by the hard drive. Unlike Virtual CD images, ISO images cannot be divided into smaller files. |
The Description is the text that designates the image in all Virtual CD programs. If you already know what you wish to write on this blank, you can enter a meaningful description here.
|
Keep in mind that this designation might be overwritten following the burning process. This depends on the settings configured on the Burn page of the Settings program. |
The Target settings for the virtual CD section defines where the blank virtual media will be stored. The path shown when this dialog opens is the default path for new virtual CDs as defined in the Virtual CD Settings. You can select a different path if desired.
|
The path and file name together must not exceed 254 characters in length. |
Add in lets you define where the virtual CD will appear in user interfaces. Options that are not available are not displayed here.
Select the Create a folder automatically option to have a separate folder created for the files that make up the virtual CD. Because multiple files are written for a single virtual blank, we recommend leaving this option activated.
Under Security for the virtual CD you can define a password, if desired, to prevent unauthorized use of the virtual CD. Once a password has been assigned, it must be entered before the virtual CD can be inserted or ejected, or its properties edited. The password has to be entered twice to define it.
The password merely protects the CD from unauthorized access. To encrypt the data that is on the CD, activate the Encrypt the data on the virtual CD option. In this case, the data is encoded using AES 256 encryption.
|
We recommend using a password that is not too easy to guess. For good security, define a password with at least 8 characters and include numbers, letters and special characters. The password is case sensitive (capitals are distinguished from lower-case letters) and can have up to 15 characters. |
|
We recommend keeping a record of your password in a safe place. Without the password, there is no way to access the data on the virtual CD. |
|
If the data on the virtual CD is not encrypted, you can change or deactivate the password later in the Properties dialog for the virtual CD. If the data is encrypted, the password cannot be changed. |
In the Inserting the new blank medium after it has been created section, under "Insert in," you can specify a virtual burner in which the virtual blank is inserted after it is created. Once you select a drive, you have the option of selecting Open system dialog for formatting if the blank is a re-writable medium.
|
Windows 7 and Vista permit formatting of blanks after a drive has been opened in the Explorer, with the blank inserted in it. Windows XP does not offer this option. A re-writable blank has to be formatted as a hard disk before it can be used. You can do this using the system functions or another suitable program. |